MTA:SA Race-Windows Server Guide
| Historical: This page is retained for historical reference. | |
Contents
Welcome
If you are having trouble setting up the MTA:SA Race Windows Server, then this guide will help you. It explains in depth how to download, configure and run the server. Regardless of your technical knowledge, I am confident that this guide is extensive enough to help you set the server up, and if it isn't, feel free to contact me. I have provided a screenshot for every step, on the right hand side of that articles paragraph.
Before you start to install, make sure you have permission from the owner of the system you're going to install the server on. If you're installing onto Windows 2000, Windows 2000 Server, Windows XP or Windows Server 2003, your user account will need to have administrative rights to be able to install software. To check if you are a computer administrator, enter the control panel (Start->Settings->Control Panel on Windows 2000/Server or Start->Control Panel on Windows XP/Windows Server 2003). Then go to Users (Windows 2000/Server) or User Accounts (Windows XP/Windows Server 2003), select your user account, and check it if says Computer Administrator. If you are not an administrator, you will need to contact somebody who is one, and ask them to complete Steps 1-3.
Step 1: Downloading the software
Sounds obvious, but some people don't know how to. Start by navigating yourself to the downloads page. Once here, pick your download from one of the mirrors. You will need to download MTA:SA 1.1.1 Dedicated Server - Windows. It's probably wise that you pick the mirror which is in the location geographically closest to you, because in theory the closer it is, the less hops, and the faster download speed you will achieve. For this example, I'm going to pick my own mirror since it's in the United Kingdom like me, and is infact hosted on my ISP's webserver so I should get the highest speed.
When prompted with the download window, choose to Save the file to your desktop.
Step 2: Extracting the files
Once saved to your desktop, you will need to extract the files. Since the files are compressed into a RAR archive, you will need software capable of extracting from it. The most popular software is WinRAR. Depending on which software you are using, you should be able to double click the RAR file and extract it to a new folder on your desktop (pictured right).
After extraction, you will have a new folder on your desktop called mtaserver-win32-v1.1.1 (version number correct at time of writing).
Step 3: Installation
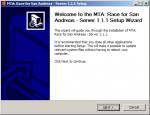
Navigate into your new folder on the desktop and double click on MTA Server Setup.exe which should be the only file inside the folder. You will be presented with a screen similar to the one in the picture on the right.
Click Next. You will now be presented with the End User Licence Agreement (EULA). You MUST agree to this and abide by it if you plan to install the software. Read carefully through it and if you agree, click I Agree. If you do not agree, or intend to violate the agreement at any time in the future, you are legally required to cancel the installation. The next screen you get to will ask which components you would like to install. Since the full install is only 6.8MB in size, I suggest you leave them all ticked (default) and click Next. Now you are asked which directory you would like to install the server to. By default, it is:
C:\Program Files\MTA San Andreas
For simplicity and to make it easier for us to help you in the future, should you run into problems, I suggest you leave this. However, if you need to install it to another location specifically (such as another hard drive etc), do so. Click Install. The installer will now extract all of the necessary files to the directory you've specified. When the wizard completes, UNTICK the box and click Finish.
Step 4: Configuration
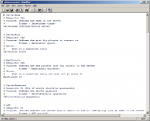
Configuring the server is easy. Browse to the folder you installed the server in (the default directory is mentioned above in the last step). In this folder there should be another folder called server. Open it, and inside this folder will be another folder called mods, and inside this, another folder called race. Once in the race directory, you will see a file called mtaserver.conf. This is your server configuration file. Right click on the file, choose Open With and select Wordpad. You should now see something like the picture on the right.
In the configuration there are many variables you can change to suit your needs. As an example of how to edit them, I will use the ServerPassword variable. By default, it looks like this:
# ServerPassword
# Required: No (Yes if server should be passworded)
# Purpose: Defines the server password
#          Format - ServerPassword <password>
#ServerPassword mypassword
As you can see, there is a leading hash (#) on the last line. This means that line is commented out, and the server won't read it, which in turn means that the server won't enforce a password. If you would like to make your server private, uncomment (remove the leading hash) from the last line, and obviously change mypassword to whatever you want the password to be. So if I wanted my server to have the password sheep, I would edit that section so it looked like this:
# ServerPassword
# Required: No (Yes if server should be passworded)
# Purpose: Defines the server password
#          Format - ServerPassword <password>
ServerPassword sheep
When configuring the MaxPlayers for your server, bear in mind that the amount of players you can have is effectively limited by your upstream and downstream bandwidth. While you may have a 4Mbps download speed, your upload speed may only be 512Kbps. Even when the server is the ONLY program using your network resources, a 512Kbps upload may only be able to hold 5-8 players without lagging. There is a solution to this, and it is to either upgrade to a connection with a much faster upstream such as Verizon's FiOS service in the United States, which ranges from 1 to 5Mbps upload speed. There are also many ISP's in Europe (excluding the United Kingdom) which offer connections with upto 100Mbps upload rates. Alternatively, you can purchase a server from a dedicated hosting company, which is conveniant because they will set up and manage the server for you for a small charge.
Pretty simple, eh? The rest of the config is fairly self explanatory.
Step 5: Running the server
Go back to the C:\Program Files\MTA San Andreas\server\ directory, or wherever you installed the server. There will be a file called MTA Server.exe. As long as your server is configured, it is ready to be run. To start the server, double click the exe file. A DOS window will appear and look something like my screenshot on the right, depending on how you've configured the server.
Congratulations - your server is now running!
Step 6: Other stuff (optional)
Whoopee, the hard part is over. But you may run into problems if you're behind a software firewall (such as ZoneAlarm) or a hardware firewall (such as a NAT, router, gateway or proxy server). These devices can be common on corporate networks and University Resnet's, and unfortunately you probably won't have access to the device administration, so running a server from a University, College or any other Corporate network may be impossible.
If you ARE using a firewall, you will need to tell the program or device to allow direct connections on certain ports so that players from outside your local network can play on your server. There are 3 main ports which you will need to open.
Server port: by default this is 22003 (but you may have changed it in the config). You will need to open the server port if you want players on the Internet to be able to connect to your server.
Admin port: by default this is 44003 (but you may have changed it in the config). You will only need to open the admin port if you wish for people from the Internet to be able to connect to the remote administration for your server.
ASE port: this is always the server port + 123, so if you are using the standard server port it will be 22003 + 123 so ultimately 22126. You only need to open the ASE port if you have ASE reporting set to 1 in the config and want your server to appear on the server list and ASE browser.
For help on opening ports in your router, consult the device manual/website. You can also check Portforward.com which contains an extensive list guides on port forwarding for many different makes and models of routers.
Good luck running your server.


